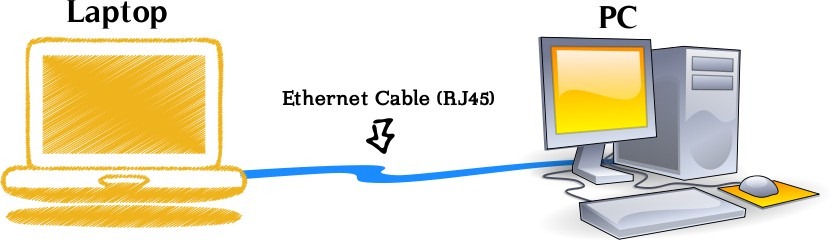
Step 1: Connect the two system via crossover or straight-through Ethernet cable, i.e. Laptop or PC to another Laptop or PC via RJ45 Cable
Connect one end of Ethernet cable to the network card slot of computer 1 and other end of Ethernet cable to the network card slot of computer 2.
Note: Both computers should have network card and Ethernet Driver installed.
Step 2: Configuring LAN settings in Windows 7
Once both the system is connected via LAN, it’s time to configure some settings in windows 7. In order to connect both systems via LAN, system needs to identify the connection via IP address. We need to assign different IP address for both systems.
- Go to Start –> In below search bar type “ ncpa.cpl ” and Enter. Network Connection window will open.
- Select “Local Area Connection”, right-click and select Properties.
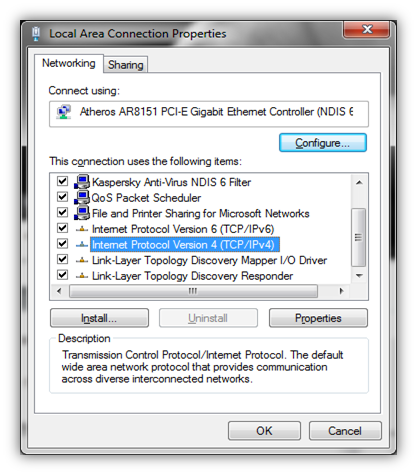
- Local Area Connection Properties box will appear. Under Networking tab, select Internet Protocol Version 4 (TCP/IPv4) and click on the Properties or Double-click on it.
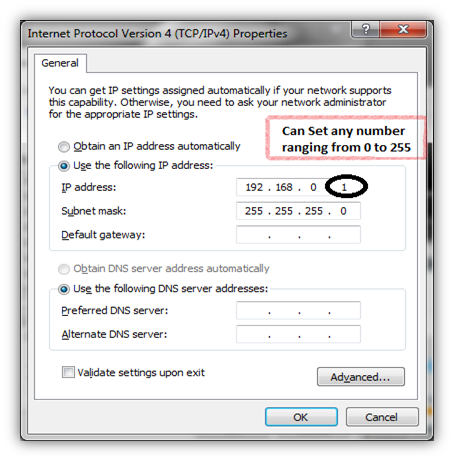
- Now set IP address as mentioned below in each computer and click on OK.
| Computer 1 | Computer 2 |
| IP address: | 192.168.0.1 | 192.168.0.2 |
| Subnet mask: | 255.255.255.0 | 255.255.255.0 |
The circled field can hold number ranging between 0 to 255. We have different IP address for each PC or System, i.e. 192.168.0.1 for computer 1 and 192.168.0.2 for computer 2.
Step 3: Assign same Workgroup in Windows 7
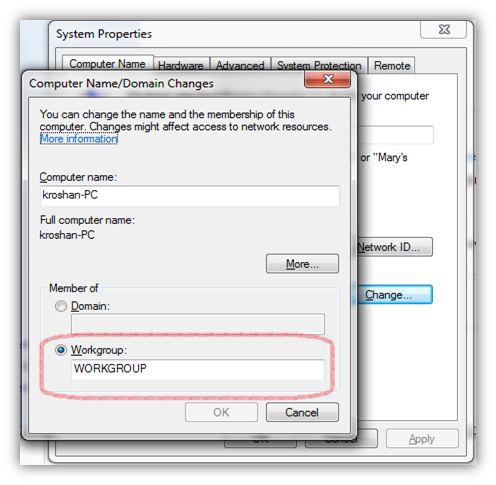
It is very important that both the system should have the same workgroup name otherwise it won’t work and system won’t be able to connect to the another system. To check or change workgroup, follow below steps.
- Open Computer Properties, Press Start + Pause Break
- Click on Change settings ( You can see the workgroup name here, follow the same steps to check on other computer. If the Workgroup names are different then assign the same workgroup name for both computer, follow the steps below to change.)
- Click on Change and assign a same workgroup name.
If Workgroup name are same on both systems then there is no need to do anything. Now restart both the system.
Step 4: Share Files
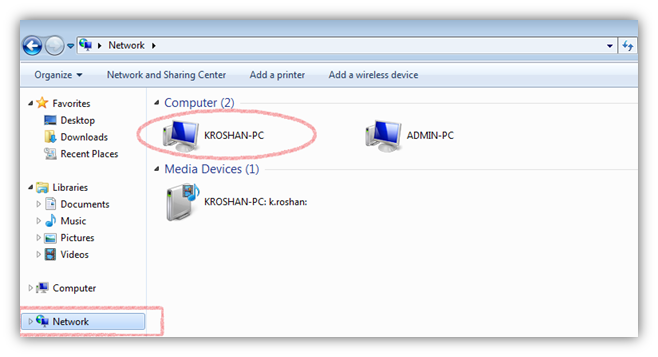
After booting both the system, Go to Computer and click on Network from the left sidebar. You may see an icon of computer with the computer name of second computer which you connected. Similarly, you may see the computer icon of first computer is appearing in the network window of second computer. This means that both computers are now connected and can access each others shared files on the network.
Now double-click on the computer icon. If the other computer is password protected, you may need to enter exact user name and password of the other computer to get access to shared folder.
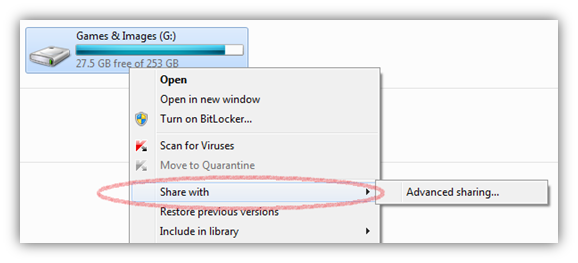
Now, you can share any files or folder with the other system by just sharing. To share any Folder or Drive, simply right-click on folder or drive–> Select Share with, and share accordingly. Once you share the files or folder, the other system can access this files or folder. In the same way, If other system shares files or folder then first computer can access files of second computer.
Important: It may be possible that, you may not see any computer icon of the other system. In such case, you might away with few security settings in windows 7.
- Go to Start –> Run –> type control.exe /name Microsoft.NetworkandSharingCenter and Enter
- Navigate to Change advanced sharing settings
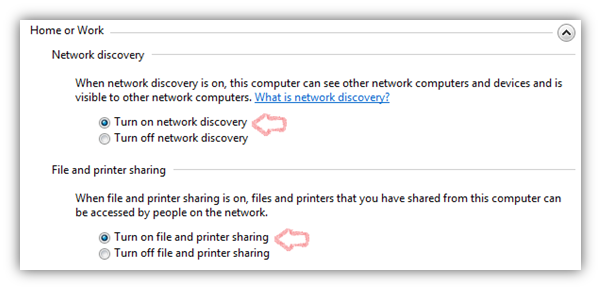
- Depending on the network profile you are using, you can set accordingly for the specific network profile. Set Network discovery as Turn on network discovery and File and printer sharing should be set as Turn on File and Printer sharing.
- Click on Save changes.
Easiest way to connect Other System on Network
Either you can access other systems via Network Folder or you can use run command to access. Open Run Command, Windows + R and type two back-slashes(\\), followed by the IP address of the computer you want to connect. Here, we set second computer IP address as 192.168.0.2, so in Run command you will type
\\192.168.0.2 and Enter.
You will see all shared files and folder of other PCs.
If you are still not able to connect laptop to PC via LAN or vice versa, then let us know on the same so that we could help you on that. In case of any queries or suggestion, you can share it with us in below comment section.