Subscribe:

FACEBOOK

Labels

MY OTHER BLOGS

ONENETBRAIN

welcome to our webiste

Thursday 28 February 2013

How To Download My Facebook photos,videos,etc

Now you can download your Facebook account information with few clicks only,  doesn't need any software's to download your Photo's, favorite Video's and your Timeline information. Facebook provides a download option on the Account Settings page. The downloaded Archive file containing various information from your account, including messages and chat history.


Steps To Download Facebook Data:

  • Open your Facebook account and Click the  Menu  at right top corner of Facebook.
 
  
  • Click on  Account Settings.


  • Then Click on " Download a copy of your Facebook data"
  • Finally Click " Start My Archive".
 
 
The Archive Contains?
  • Your contact information, Interests, Groups and Notes you have created.
  • Content that you and your friends have posted to your timeline.
  • Photos and videos that you have uploaded to your account
  • Your friend list and Your sent and received messages
  • Comments  on your timeline posts, photos, and other timeline content.
There's also an Expanded Archive available. 
  •  Click on Expanded Archive to see more about your account history.

  • This is in addition to your downloaded info, and contains even more account info like Login , cookies and more.

How to Remove Autorun.inf Virus

Auto run-virus is a kind of viruses that writes itself on a flash drives, memory cards and other external devices and infect user’s computer when the user opens a flash  drive. You can prevent your system from Autorun virus by installing USB Security software's. That will automatically blocks the Autorun.inf files while you insert the flash drive into your system. You can also remove the Autorun.inf virus from system and flash drives by manually using Ms-Dos CMD. 


Steps to Remove Autorun.inf Virus:


  • Click Start--> Run and type cmd then press Enter. 
  • It will open the Command prompt window type cd\ press Enter to enter the C drive
  • Type attrib and press Enter. It will show all system files on the C drive.
  • Check carefully is there any  autorun.inf  file inside ? Before delete the virus we need to disable the Read only of that file.
  • For that type attrib -h -r -s autorun.inf and press Enter then the Read only will be disabled.
  • Now type del autorun.inf then press Enter .It will delete the autorun.inf file.
  • Similarly change the drives to delete autorun.inf file on that drive.
For Drive D:
  • Type C:\Documents and Setting\user>d:>dir d: then press Enter
For Drive E:
  •  Type C:\Documents and Setting\user>e:>dir e: then press Enter
  • Restart the system after delete the virus on each drives.  
Tips and Tricks:
Before you do all above process follow these steps to get more result.
  • Disable the System Restore. ( Control Panel-->System-->System Restore then click on   " turn off system restore on all devices" ).

  • Delete the temporary internet files on your IE browser ( Tools--> Options--> Internet temporary -->delete files then click on "delete all offline content" and click "OK" ).

  • Clean your each hard drives ( Start-->All Programs-->Accessories-->System Tools-->Disk Clean up then "select C drive" click "OK" similarly repeat this for all drives.)

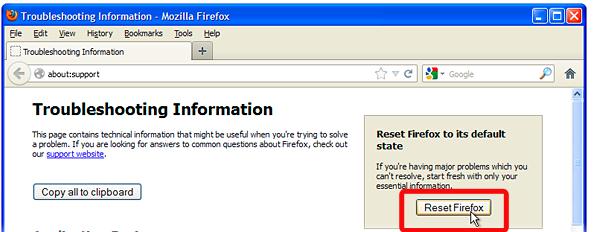
Reset Firefox Browser Setting as to Default

Steps to Reset Firefox :


  • Click the Help menu and select Troubleshooting Information


  • Click on Reset Firefox button in the upper-right corner of the Troubleshooting Information page. 


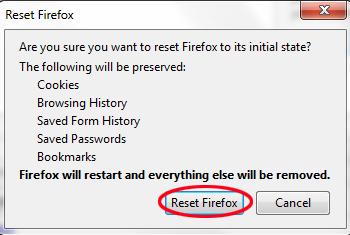
  • It will open a confirmation window  the click Reset Firefox.


  • Then Firefox will close and be reset and Click Finish and Firefox will open. 

Add Fevicon On Blog

Simply upload the file, favicon.ico to the blog or other free uploading websites and get the Link. Make sure your favicon file is named “favicon.ico.” When someone bookmarks your site with a browser that supports favicons, your favicon will appear. Alternatively, you can use this code between the <head></head> (x)HTML tags:
<link rel=”shortcut icon” href=”http://www.thenameofyoursitehere.com/favicon.ico” mce_href=”http://www.thenameofyoursitehere.com/favicon.ico”/>


Some browsers will look for a direct link in the HTML source code to your site's favicon.ico file. You can help these browsers by adding this link in the head section of each page on which you want the Favicon.ico to appear.
Here is the link code to include: <link rel="Shortcut Icon" href="/favicon.ico">
Once you've added this code, upload all of your modified pages.

(Some people suggest that the following is actually more correct: <link rel="icon" href="/favicon.ico" type="image/x-icon"> You can use both if you want!)

If you want to use a GIF or PNG instead, use this format instead (just remember that it won’t work in IE):

<link rel="icon" href="/favicon.png" type="image/png"> or
<link rel="icon" href="/favicon.gif" type="image/gif"> 


Thanks
Enjoy with fevicon

Uninstall Internet Exporer 10 from Windows 8

Most of internet users are browsing through different web browsers like Google chrome , Firefox and Opera etc because of the features on it. Only few peoples are using the  Internet Explorer versions ( ie 8, ie 9 and ie 10) which is pre-installed in Windows Operating systems (windows 8, windows 7, windows xp and later version).


      This post guides you that " how to uninstall internet explorer IE 10 from your computer in  Windows  8". The following guidelines will only removes the executable file of the browser from your computer and it won't affect any other applications depend upon its engine for rendering. Some program files which is associated with the Internet explorer will be shared with another browser (Firefox,Chrome,Opera etc )installed in your computer.

Steps to uninstall the Internet Explorer from Windows:
  • Click " Start "  and Open " Control Panel " .

  • Click on Programs and Features.
  • Click on " Turn Windows features on or off " on the left side


  • It will open  " Windows Features " screen and uncheck the Internet Explorer 10 check box.


  • Now a new confirmation window will open.Click on  Yes to disable Internet explorer.


  • Then Click OK button on Windows Features screen to save the settings. 

  • It will take some time to uninstall it from computer then Restart your computer.
After restart your computer the Internet explorer will no longer be available

Use pdf Files in Blogger

As we all know Blogger doesn't support PDF file to publish in your Blog . If you want to show the pdf content in your blog,what shall you do ? PowerPoint files too facing same problems in your blogger.iframe and other codes will not help us on this particular issue ,.A web tool can helps us to publish PDF file or Powerpoint file in blog.This can be create slideshow and Content at a run.

  • Go to scribd and Create New account.
  • Now Upload your File into scribd.
  • At the Right sidebar, Click on "Embed".And Copy down the HTML5 code.

Window Movie Maker all Versions Free Download

Movie Maker has been the most amazing utility which comes by default loaded with windows both in windows xp and vista. Windows Movie Maker also comes with windows live pack which has movie maker beta which is not so powerful in terms of features.
Movie Maker which comes in built with windows provides these features including recording video from your Digital cameras, handy cam etc, adding text and effect in the video, import video to edit, add titles and credit etc.
windows-movie-maker-full-featured
Here are the links to download different versions of movie maker with some what feature variation.

Download

Windows Movie Maker 2.1
Windows Movie Maker 2.6
Windows Movie Maker 5.1

Note: If you are confused in the above links, we would suggest you to download the newest version 5.1
You can also download this version of windows movie maker which comes with windows xp service pack 2
Window Movie Maker ( Windows XP ) 2
Moreover, A contributor “Devrexster” @ WinMatrix has also created a portable version of Windows Movie Maker 2.6 which works with Windows XP, Vista and Windows 7 ,  you can download from the link given below.
Portable Windows Movie Maker [ Link Updated ]

Send EXE Files through EMails by Using Google Drive

Gmail now allows users to upload and share files via google drive, so in order to use this firstly you should have enabled or activated the new compose feature in gmail and once you compose a new email with new compose box, you will see the google drive icon which lets you upload a file while composing a new email.
new_google_drive_upload_from_gmail
Once you select the google drive option, you can upload a file which can be of any extension including it can be exe as well.
insert_gmail_drive
Once you upload a file, you will see in the email compose box but that does not mean that the receiver will be able to download the file from google drive as a file uploaded on google drive is private to you by default.
Send_Exe_in_Gmail_
Now the receiver wont be able to download the file from google drive, unless you share the same with the person by opening google drive in other window but still they can request the access the file from the link to the file they are sent in this email.
request_access_to_file_on_google_drive
But if you don’t want  this to happen at the first place, you will need to open google drive and edit the sharing permissions for the file on drive.google.com
share_a_file_on_google_
You will need to select the file in google drive and then click sharing – then specify can edit, can comment or can view if you want the other person to download the file, you should select can edit.

Additional Tip:
              Similarly you can share any big file in gmail as attachment by using google drive – the max upload limit is 10 gb but the free limit per user is 5gb however if you upload a bigger file size you can pay for the additional storage you use for the file in google drive.

Thursday 21 February 2013

Google Sky Map For Android Mobiles

A stunning app that renders Patrick Moore obsolete, by using your phone's orientation tools to give you an accurate representation of the stars and planets on your screen. Point your phone at the sky, then learn what constellations are visible and if that's a UFO or just Venus. Google Sky Map even works indoors, if you're not keen on getting cold.
Google sky map

Thursday 7 February 2013

World at Arms game For Android mobile Free download

Description

LOCK AND LOAD! The United States of America is under attack by an evil alliance of highly trained forces known as the KRA. As the leader of the free world, YOU have to stand and fight. Build and develop your military base, train your army, and battle against or ally with players from all over the world online in order to defeat the enemy for good!World at Arms is the new ground-breaking social game by Gameloft!
- Enjoy the most beautiful war simulation on smartphone with outstanding graphics & animations, plus extra-realistic units & buildings.
- Engage in innovative, strategic and breathtaking battles across the globe, in the air and on the ground (desert, urban and snow), and unleash deadly power-ups to crush your enemy before he crushes you!
- Manage an extensive economy: Collect resources, build and develop a wide variety of units and buildings & upgrade your base to become the top superpower
- Immerse yourself in a long, rich and dynamic campaign with more than 75 missions to complete!
- Take action and attack any player in the world, loot them for bonuses and climb up the leaderboards!
- Connect with your friends through Facebook, Game Center or Gameloft LIVE! and borrow their units during battle to defeat tough enemies.
- Unlock loads of achievements!

App Screenshots

Sunday 3 February 2013

Latest Nokia Mobile Secret Codes


Nokia 1610

To see IMEI
press *#06#

Software Version:
press *#170602112302#

Nokia 2110

To see IMEI
press *#06#

Cell Name:
press [MENU] 4 9 1

Firmware Date:
press *#3283# and (* # D A T E *) will appear.
If the year is 95, the first two digits represent the month and the last two the year; if the year is 96, the first two digits are the week of the year.

Software Version:
To find out software version on the 2100e/2100i models, press *#170602112302#.
In more recent versions, the code has changed to *#682371158412125#.

It should appear, for instance:
V 5.31 software version
06-11-96 date manufactured
NHE-4 model GE8 = 9000

Hidden Menus:
Press *, then "memory", then "find" or *, then "down arrow", and you will see the received calls.
Press +, then "memory", then "find" or +, then "down arrow", and you will see the last calls.

Nokia 3210

To see IMEI
press *#06#

Software Version:
Press * # 0000 # and you will see software version, manufacture date and phone model.

Warranty:
press *#92702689#, and you will see:

1 IMEI
2 Made MM/YY (manufacture date)
3 date of purchase (this can be edited, but once it is set, it cannot be altered anymore).
4 Repaired (date of repair, in case it has been repaired)
5 Transfer user data

EFR:
*3370# EFR will be activated once the phone is restarted (turned off, then turned on).
#3370# EFR will be deactivated once the phone is restarted.
*4720# Half Rate will be activated once the phone is restarted.
#4720# Half Rate will be deactivated once the phone is restarted.

Nokia 3310

To see IMEI
press *#06#
Software Version:
Press * # 0000 # and you will see software version, manufacture date and phone model.

Warranty:
press *#92702689#, and you will see:

1 IMEI
2 Made MM/YY (manufacture date)
3 date of purchase (this can be edited, but once it is set, it cannot be altered anymore).
4 Repaired (date of repair, in case it has been repaired)
5 Transfer user data

EFR:

*3370# EFR will be activated once the phone is restarted (turned off, then turned on).
#3370# EFR will be deactivated once the phone is restarted.
*4720# Half Rate will be activated once the phone is restarted.
#4720# Half Rate will be deactivated once the phone is restarted.

Nokia 5110

To see IMEI
press *#06#

Software Version:
Press * # 0000 # and you will see software version, manufacture date and phone model.

Warranty:
press *#92702689#, and you will see:

1 IMEI
2 Made MM/YY (manufacture date)
3 date of purchase (this can be edited, but once it is set, it cannot be altered anymore).
4 Repaired (date of repair, in case it has been repaired)
5 Transfer user data

EFR:

*3370# EFR will be activated once the phone is restarted (turned off, then turned on).
#3370# EFR will be deactivated once the phone is restarted.
*4720# Half Rate will be activated once the phone is restarted.
#4720# Half Rate will be deactivated once the phone is restarted.

More tricks:
Shortly press the key that turns on the phone and a menu will appear. If you press the same key again, the phone will be turned off. Instead, if you use the arrow keys, you can choose between several pre-defined configurations and states of alert.

Nokia 5510

To see IMEI
press *#06#

Software Version:
Press * # 0000 # and you will see software version, manufacture date and phone model.

Warranty:
press *#92702689#, and you will see:

1 IMEI
2 Made MM/YY (manufacture date)
3 date of purchase (this can be edited, but once it is set, it cannot be altered anymore).
4 Repaired (date of repair, in case it has been repaired)
5 Transfer user data

EFR:

*3370# EFR will be activated once the phone is restarted (turned off, then turned on).
#3370# EFR will be deactivated once the phone is restarted.
*4720# Half Rate will be activated once the phone is restarted.
#4720# Half Rate will be deactivated once the phone is restarted.

Nokia 6110

To see IMEI
press *#06#

Software Version:
Press * # 0000 # and you will see software version, manufacture date and phone model.

Warranty:
press *#92702689#, and you will see:

1 IMEI
2 Made MM/YY (manufacture date)
3 date of purchase (this can be edited, but once it is set, it cannot be altered anymore).
4 Repaired (date of repair, in case it has been repaired)
5 Transfer user data

EFR:

*3370# EFR will be activated once the phone is restarted (turned off, then turned on).
#3370# EFR will be deactivated once the phone is restarted.
*4720# Half Rate will be activated once the phone is restarted.
#4720# Half Rate will be deactivated once the phone is restarted.

Nokia 6210

To see IMEI
press *#06#

Software Version:
Press * # 0000 # and you will see software version, manufacture date and phone model.

Warranty:
press *#92702689#, and you will see:

1 IMEI
2 Made MM/YY (manufacture date)
3 date of purchase (this can be edited, but once it is set, it cannot be altered anymore).
4 Repaired (date of repair, in case it has been repaired)
5 Transfer user data

Nokia 7110

To see IMEI
press *#06#

Software Version:
Press * # 0000 # and you will see software version, manufacture date and phone model.

Warranty:
press *#92702689#, and you will see:

1 IMEI
2 Made MM/YY (manufacture date)
3 date of purchase (this can be edited, but once it is set, it cannot be altered anymore).
4 Repaired (date of repair, in case it has been repaired)
5 Transfer user data

Nokia 8110

To see IMEI
press *#06#

Software Version:
Press * # 8110 #

Warranty:
press *#92702689#, and the phone will ask for a warranty code.
You can choose between:

6232 (OK) : shows manufacture month and year
7332 (OK) : shows date of last repair
7832 (OK) : shows date of purchase
9268 (OK) : shows serial number

Nokia 8210

To see IMEI
press *#06#

Software Version:
Press * # 0000 # and you will see software version, manufacture date and phone model.

Warranty:
press *#92702689#, and you will see:

1 IMEI
2 Made MM/YY (manufacture date)
3 date of purchase (this can be edited, but once it is set, it cannot be altered anymore).
4 Repaired (date of repair, in case it has been repaired)
5 Transfer user data

Nokia 8310

To see IMEI
press *#06#

Software Version:
Press * # 0000 # and you will see software version, manufacture date and phone model.

Warranty:
press *#92702689#, and you will see:

1 IMEI
2 Made MM/YY (manufacture date)
3 date of purchase (this can be edited, but once it is set, it cannot be altered anymore).
4 Repaired (date of repair, in case it has been repaired)
5 Transfer user data

Nokia 8810

To see IMEI
press *#06#

Software Version:
Press * # 0000 # and you will see software version, manufacture date and phone model.

Warranty:
press *#92702689#, and you will see:

1 IMEI
2 Made MM/YY (manufacture date)
3 date of purchase (this can be edited, but once it is set, it cannot be altered anymore).
4 Repaired (date of repair, in case it has been repaired)
5 Transfer user data

Nokia 8850

To see IMEI
press *#06#

Software Version:
Press * # 0000 # and you will see software version, manufacture date and phone model.

Warranty:
press *#92702689#, and you will see:

1 IMEI
2 Made MM/YY (manufacture date)
3 date of purchase (this can be edited, but once it is set, it cannot be altered anymore).
4 Repaired (date of repair, in case it has been repaired)
5 Transfer user data

EFR:

*3370# EFR will be activated once the phone is restarted (turned off, then turned on).
#3370# EFR will be deactivated once the phone is restarted.
*4720# Half Rate will be activated once the phone is restarted.
#4720# Half Rate will be deactivated once the phone is restarted.

Nokia 9210i

To see IMEI
press *#06#
Software Version:
Press * # 0000 # and you will see software version, manufacture date and phone model.

Warranty:
press *#92702689#, and you will see:

1 IMEI
2 Made MM/YY (manufacture date)
3 date of purchase (this can be edited, but once it is set, it cannot be altered anymore).
4 Repaired (date of repair, in case it has been repaired)
5 Transfer user data

EFR:

*3370# EFR will be activated once the phone is restarted (turned off, then turned on).
#3370# EFR will be deactivated once the phone is restarted.
*4720# Half Rate will be activated once the phone is restarted.
#4720# Half Rate will be deactivated once the phone is restarted.